
If you haven't already looked at Part 1 of the Glitter Holo Topcoat Comparison, click here to read it.
Once again, before I drive into the comparison, a want to note a few things. Many of these polishes have been provided to me for review. I have indicated in each individual polish's post whether they were provided for review or not. You can get to the individual posts by clicking on the polishes' names below. Whether I purchased the polish or was provided it for review, all polishes will be reviewed fairly and all opinions are my own.
Once again, before I drive into the comparison, a want to note a few things. Many of these polishes have been provided to me for review. I have indicated in each individual polish's post whether they were provided for review or not. You can get to the individual posts by clicking on the polishes' names below. Whether I purchased the polish or was provided it for review, all polishes will be reviewed fairly and all opinions are my own.
I want to thank all the makers who have provided polishes to be included as well as those who encouraged me to undertake this beast of a comparison. Special thanks to Lauren (@lwarzy) for her help swatching some HTF polishes and her donation of swatch sticks. She actually bought the same exact base colors I was using to be able to send me accurate swatches.
There are polishes included in this comparison that are no longer for sale directly from the maker. Why did I include these if they're hard to buy you ask? Including hard to find polishes can help determine if hunting down the polish is worth it, or maybe someone already owns one of these and wonders how it stacks up against the competitors. I do hope if you fall in love with one of the discontinued polishes that you're able to hunt one down in a destash.
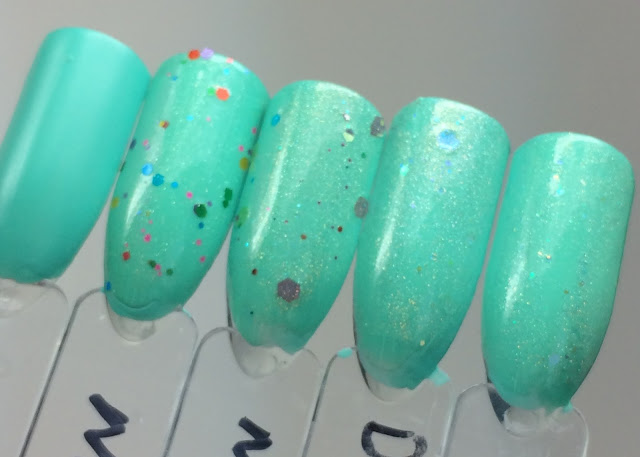
The order of the polishes stays the same in all pictures below. Click the links for more pictures and information about each polish. Note the numbering as I will use it to refer to the swatches throughout the post.
From left to right:
1. Plain stick with no holo topcoat
2. NailNation 3000 Let's Play A Game
3. NailNation 3000 Phishing 4 Holo
4. Darling Diva I Want Your Sex
5. Darling Diva How Many Licks?
2. NailNation 3000 Let's Play A Game
3. NailNation 3000 Phishing 4 Holo
4. Darling Diva I Want Your Sex
5. Darling Diva How Many Licks?
Each stick is a base color with one coat of the holo topcoat followed by one coat of Seche Vite topcoat.
The polishes used for the base colors are as follows:
Black - Funky Fingers Dark Knight
White - Funky Fingers Gesso
Sea Foam Green - Torrid Mint Nail Polish
Red - Fresh Paint Burning Flame
First here are all the colors together.


Not all of the glitters show up well over black. I'd say #2 (remember the plain one is #1) is the best over black because it has the least graying and the most visible glitters.


I really love all of these over white, though I thought #4 was the most graying.


Click here to continue on to Part 3.


The lighter colors seem to best highlight the glitters, especially in #2 and #3.


I really love all of these over white, though I thought #4 was the most graying.


The holo effects are very nice on all of these over the sea foam green, though the glitters look muted on #3.


The red seemed to hide most of the glitters and shows a lot of graying.
Overall, my favorite is #3 (NailNation 3000 Let's Play A Game). This topper is just so whimsical and fun. It also was the least graying of the bunch since its holo effect wasn't as strong. Honorable mention to #5; I liked the smaller glitter which really shined over lighter colors. None of these seemed as strong over dark colors though.
No comments:
Post a Comment